Bell Eapen MD, PhD.

Bringing Digital health & Gen AI research to life!

Deploy a fastai image classifier using OpenFaaS for serverless on DigitalOcean in 5 easy steps!

Fastai is a python library that simplifies training neural nets using modern best practices. See the fastai website and view the free online course to get started. Fastai lets you develop and improve various NN models with little effort. Some of the deployment strategies are mentioned in their course, but most are not production-ready.

OpenFaaS® (Functions as a Service) is a framework for building Serverless functions easily with Docker that can be deployed on multiple infrastructures including Docker swarm and Kubernetes with little boilerplate code. Serverless is a cloud-computing model in which the cloud provider runs the server, and dynamically manages the allocation of machine resources and can scale to zero if a service is not being used. It is interesting to note that OpenFaaS has the same requirements as the new Google Cloud Run and is interoperable. Read more about OpenFaaS (and install the CLI) from their website.

DigitalOcean: I host all my websites on DigitalOcean (DO) which offers good (in my opinion) cloud services at a low cost. They have data centres in Canada and India. DO supports Kubernetes and Docker Swarm, but they offer a One-Click install of OpenFaaS for as little as $5 per month (You can remove the droplet after the experiment if you like, and you will only be charged for the time you use it.) If you are new to DO, please sign up and setup OpenFaaS as shown here:

In fastai class, Jeremy creates a dog breed classifier.

As STEP 1, export the model to .pkl as below

learn.export()

This creates the export.pkl file that we will be using later. To deploy we need a base container to run the prediction workflow. I have created one with Python3 along with fastai core and vision dependencies (to keep the size small). It is available here: https://hub.docker.com/r/beapen/fastai-vision But you don’t have to directly use this container. My OpenFaaS template will make this easy for you.

STEP 2: Using the OpenFaaS CLI (How to Install) pull my template as below:

mkdir dog-classifier
cd dog-classifier
faas-cli template pull https://github.com/dermatologist/python3-ml --prefix your-docker-uname
faas-cli new --lang fastai-vision dog-classifier

STEP 3: Copy export.pkl to the model folder

STEP 4: Add http://digitaloceanIP:8080 to dog-classifier.yml

provider:
  name: openfaas
  gateway: http://digitaloceanIP:8080

and finally in STEP 5:

faas-cli up -f dog-classifier.yml

That’s it! Your predictor is up and running! Access it at http://digitaloceanIP:8080/function/dog-classifier

The template has a builtin image uploader interface! If you get stuck at any stage, give me a shout below. More to follow on using OpenFaaS for deploying machine learning workflows!

Serverless on FHIR: Management guidelines for the semi-technical clinician!

Serverless is the new kid on the block with services such as AWS Lambda, Google Cloud Functions or Microsoft Azure Functions. Essentially it lets users deploy a function (Function As A Service or FaaS) on the cloud with very little effort. Requirements such as security, privacy, scaling, and availability are taken care of by the framework itself. As healthcare slowly yet steadily progress towards machine learning and AI, serverless is sure to make a significant impact on Health IT. Here I will explain serverless (and some related technologies) for the semi-technical clinicians and put forward some architectural best practices for using serverless in healthcare with FHIR as the data interchange format.

artificial intelligence
Serverless on FHIR

Let us say, your analyst creates a neural network model based on a few million patient records that can predict the risk for MI from BP, blood sugar, and exercise. Let us call this model r = f(bp, bs, e). The model is so good that you want to use it on a regular basis on your patients and better still, you want to share it with your colleagues. So you contact your IT team to make this happen.

This is what your IT guys currently do: First, they create a web application that can take bp, bs and e as inputs using a standard interface such as REST and return r. Next, they rent a virtual machine (VM) from a cloud provider (such as DigitalOcean). Then they convert this application into a container (docker) and deploy it in the VM. You now can use this as an application from your browser (chrome) or your EMR (such as OpenMRS or OSCAR) can directly access this function. You can share it with your colleagues and they can access it in their browsers and you are happy. The VM can support up to 3 users at a time.

In a couple of months, your algorithm becomes so popular that at any one time hundreds of users try to access it and your poor VM crashes most of the time or your users have to wait forever. So you call your IT guys again for a solution. They make 100 copies of your container, but your hospital is reluctant to give you the additional funding required.

Your smart resident notices that your application is being used only in the morning hours and in the night all the 100 containers are virtually sleeping. This is not a good use of the funding dollars. You contact your IT guys again, and they set up Kubernetes for orchestrating the containers according to usage. So, what is Serverless? Serverless is a framework that makes all these so easy that you may not even need your IT guys to do this. (Well, maybe that is an exaggeration)

My personal favourite serverless toolset (if you care) is Kubernetes + Knative + riff. I don’t try to explain what the last two are or how to use them. They are so new that they keep changing every day. In essence, your IT team can complete all the above tasks with few commands typed on the command line on the cloud provider of your choice. The application (function rather) can even scale to zero! (You don’t pay anything when nobody uses it and add more containers as users increase, scaling down in the night as in your case).

Best Practices

What are the best practices when you design such useful cloud-based ‘functions’ for healthcare that can be shared by multiple users and organizations? Well, here are my two cents!

First, you need a standard for data exchange. As JSON is the data format for most APIs, FHIR wins hands down here.

Next, APIs need a mechanism to expose their capabilities and properties to the world. For example, r = f(bp, bs, e) needs to tell everyone what it accepts (bp, bs, e) and what it returns (at the bare minimum). FHIR has a resource specifically for this that has been (not so creatively) named as an Endpoint. So, a function endpoint should return a FHIR Endpoint resource with information about itself if there is no payload.

What should the payload be? Payload should be a FHIR Bundle that has all the FHIR Resources that the function needs (bp, bs and e as FHIR Observations in your case). The bundle should also include a FHIR Subscription resource that points to the receiving system (maybe your EMR) for the response ( r ).

So, what next?

Take the phone and call your IT team. Tell them to take
Kubernetes + Knative + riff for a spin! I might do the same and if I do, I will share it here. And last but not the least, click on the blue buttons below! 🙂

Natural language processing (NLP) tools for health analytics

Natural language processing (NLP) is the process of using computer algorithms to identify key elements in language and extract meaning from unstructured spoken or written text. NLP combines artificial intelligence, computational linguistics, and other machine learning disciplines.

natural language processing

In the healthcare industry, NLP has many applications such as interpreting clinical documents in an electronic health record. Natural language processing is important in clinical decision support systems by extracting meaningful information from free-text query interfaces. It may reduce transcription costs by allowing providers to dictate their notes, or generate tailored educational materials for patients ready for discharge. At a high-level NLP includes processes such as structure extraction, tokenization, tagging, part of speech identification and lemmatization.

“cTAKES is a natural language processing system for extraction of information from electronic medical record clinical free-text. Originally developed at the Mayo Clinic, it has expanded to being used by various institutions internationally.”

cTAKES is relatively difficult to install and use, especially if the service needs to be shared by several systems. I have integrated cTakes into an easy to use spring boot application that provides REST web services for clinical document annotation. The repository is here.

[github-clone username=”dermatologist” repository=”ctakes-spring-boot”]

You need a UMLS username and password for deploying the application. RysannMD is an efficient and fast system for annotating clinical documents developed at Ryerson University. Some of my other experiments with NLP are available here.

Are you working on any NLP projects in medicine?

How to create a Neural Network model for business in 10 minutes

Neural Network and deep-learning are the buzzwords lately. Machine learning has been in vogue for some time, but the easy availability of storage and processing power has made it popular. The interest is palpable in business schools as well. The ML related techniques have not percolated much from the IT departments to business, but everybody seems to be interested. So, let us build a Neural Network model in 10 minutes.

Computer Programming

This is the scenario:

You have a collection of independent variables (IV) that predict a dependent variable (DV). You have a theoretical model and want to know if it is good enough. Remember, we are not testing the model. We are just checking how good the IVs are in predicting DV. If they are not good predictors to start with, why waste time conjuring a fancy model! Sounds familiar? Let’s get started.

Setup

Do you have some preliminary knowledge of python? If not spend another 10 minutes here learning python. Now you have to spend some time to set up your system once. Just follow these instructions.

Code

The first step is to import few modules. If you don’t know what these are, just copy paste and ignore. Consider them as a header that you require.

# Modules
import sys
import numpy
from imblearn.over_sampling import RandomOverSampler
from keras.layers import Dense
from keras.models import Sequential
from pandas import read_csv

Create a CSV file with your data with the last column as your DV. Now import that file.

# Import data
dataset = read_csv(sys.argv[1], header=1)
(nrows, ncols) = dataset.shape

nrows and ncols are the numbers of rows and columns. Now separate DV (y) from IVs (X) as below.

# Separate DV from IVs 
values = dataset.values
X = values[:, 0:ncols-1]
y = values[:, ncols-1]

In most cases, you will be trying to predict a rare event. So add some oversampling for taste 🙂

# Oversampling
ros = RandomOverSampler(random_state=0)
X_R, y_R = ros.fit_sample(X, y)

Create, compile and fit the model.

# create model
model = Sequential()
model.add(Dense(12, input_dim=vnum, kernel_initializer='uniform', activation='relu'))
model.add(Dense(8, kernel_initializer='uniform', activation='relu'))
model.add(Dense(1, kernel_initializer='uniform', activation='sigmoid'))
# Compile model
model.compile(loss='binary_crossentropy', optimizer='adam', metrics=['accuracy'])
# Fit the model
model.fit(X_R, y_R, epochs=150, batch_size=10, verbose=2)

The three model.add statements represent the three layers in Neural Network. The number after Dense is the number of neurons in each layer. You can play with these values a bit. These settings should work in most business cases. Read this for more information.

Now evaluate the model.

# evaluate the model
scores = model.evaluate(X_R, y_R)
print("\n")
print("\n Accuracy of the model")
print("\n%s: %.2f%%" % (model.metrics_names[1], scores[1] * 100))
print("\n --------------------------------------------------")

Put this code in a file (say nnet.py) and use it as below.

python nnet.py mydata.csv

TL;DR

Just use QRMine. nnet.py is in there.

Operationalizing Neural Network models

Shortly, I will show you how to operationalize a model using flask.

ASP.NET Core 1: Some useful code snippets

ASP.NET Core is Microsoft’s answer to open source web development platforms. Probably it was inevitable as they realize the futility of fighting the open source ecosystem with the ever growing popularity of node, npm, and bower. If you can’t beat them, join them 🙂eHealth Programmer Girl

Most healthcare organizations in Canada still use the Microsoft products and hence ASP.NET Core may be a good platform to build business applications. As it is platform agnostic, you can deploy it on Linux, if things change in the future (Yes, It is possible with Core). Of late I have been working on an ASP.Net Core project (an intranet portal) and would like to share some code snippets that may be useful to others.

If you need to export the CRUD Index (list) as .csv, here is a useful resource from @damienbod https://github.com/damienbod/AspNetCoreCsvImportExport

The implementation of the InputFormatter and the OutputFormatter classes are specific for a list of simple classes with only properties. If you have more complex classes, map only the properties that you need to serialize as below:

var libraries = _context.Libraries.Where(u => u.Contact.UserName == MyUserName.Name())
.Select(s => new { s.ContactID, s.RequestType, s.RequestFilledBy, s.RequestDate, s.RequestStatus, s.Pmid, s.Author, s.JournalBook, s.Title }).ToList();

I could not find any good reference to implement multiple file upload. The Microsoft’s documentation in this instance was unfortunately not very clear: https://docs.microsoft.com/en-us/aspnet/core/mvc/models/file-uploads

Here is my improvisation:

using System;
using System.Collections.Generic;
using System.Linq;
using System.Threading.Tasks;
using Microsoft.AspNetCore.Http;
using System.IO;
using System.IO.Compression;

namespace MyNameSpace
{
    public static class FileUpload
    {
        public static byte[] ToZip(List<IFormFile> files)
        {
            long size = files.Sum(f => f.Length);

            // full path to file in temp location: var filePath = Path.GetTempFileName();
            var tempPath = Path.GetTempPath();
            var filePath = tempPath + "/submission/";
            var archiveFile = tempPath + "/zip/archive.zip";
            var archivePath = tempPath + "/zip/";
            if (Directory.Exists(filePath))
            {
                Directory.Delete(filePath, true);
            }
            if (Directory.Exists(archivePath))
            {
                Directory.Delete(archivePath, true);
            }

            Directory.CreateDirectory(filePath);
            Directory.CreateDirectory(archivePath);

            foreach (var formFile in files)
            {
                var fileName = filePath + formFile.FileName;
                if (formFile.Length > 0)
                {
                    using (var stream = new FileStream(fileName, FileMode.Create))
                    {
                        formFile.CopyToAsync(stream);
                    }
                }
            }
            ZipFile.CreateFromDirectory(filePath, archiveFile);
            /* beapen: 2017/07/24
             * 
             * Currently A Filestream cannot be directly converted to a byte array.
             * Hence it is copied to a memory stream before serializing it.
             * This may change in the future and may require refactoring.
             * 
             */
            var stream2 = new FileStream(archiveFile, FileMode.Open);
            var memoryStream = new MemoryStream();
            stream2.CopyTo(memoryStream);
            using (memoryStream)
            {
                return memoryStream.ToArray();
            }
        }
    }
}


https://gist.github.com/dermatologist/5f3900074e7383befe5363331de238e6

Hope this helps.

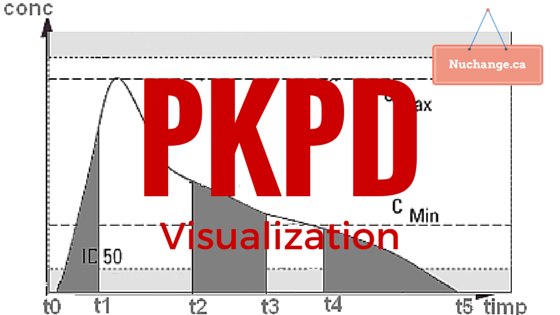
How to visualize PKPD models

PKPD Visualization

Image credit: Farmacist at ro.wikipedia [Public domain], from Wikimedia Commons. (Image altered and text added)

A couple of my friends asked me about ideas for PKPD visualization for their projects. I am not a PKPD expert, but I have tried to organize some of the tools for this purpose that I have found during my search. Maybe it will help someone to avoid reinventing the wheel.

First a brief introduction to the problem as I understand:

Pharmacokinetics (PK) is what the body does to the drug (elimination or redistribution). Pharmacodynamics (PD) is what the drug does to the body (Its effect). PKPD models conceptually link both into a composite time-effect graph. Calculations associated with this conceptual linking can be quite complicated, but computers simplify this considerably.

Now a brief consideration of the variables in this calculation, again as I understand.

The calculation depends on elimination process, number of compartments, route and the regimen of drug administration.

You need clearance rate (CL), the volume of compartments V1…V3 and the intercompartmental clearance (Q1 & Q2).

A PKPD model can be described as systems of ordinary differential equations in PharmML for the number of compartments and the route of administration.

Now to the emerging concept of population pharmacokinetics:

In the above model, individual variations are not taken into account. You can calculate between-subject variability matrix if you have enough data available from various sources.

Now to the visualization options:

Visualization is important for patients to understand the need for dosage requirements in life threatening conditions like haemophilia and for doctors to plan appropriate dosage regimens.

PKPDSim by Ron Keizer (UCSF) – This is an R library that also provides a model exploration tool that dynamically generates a Shiny app from the specified model and parameters. ODEs for One, two and three model for various routes of administration is available in the library. Custom ODEs and between-subject variability can be defined. Shiny allows interactive exploration of the model, and it also generates the R code for any plot created in the interface. Shiny is R’s web application framework that turns your analyses into interactive web applications.

The example code to run shiny after installing all dependencies is below:

install.packages("devtools", dependencies = TRUE)
install.packages("ggplot2")
install.packages("shiny")
library(devtools)
install_github("ronkeizer/PKPDsim")
library(PKPDsim)

p <- list(CL = 38.48,
          V  = 7.4,
          Q2 = 7.844,
          V2 = 5.19,
          Q3 = 9.324,
          V3 = 111)

omega <- c(0.3,       # IIV CL
           0.1, 0.3)  # IIV V

sim_ode_shiny(ode = "pk_3cmt_iv",
              par = p,
              omega = omega)


Simulx: (A R function of the mlxR package for computing predictions and sampling longitudinal data from Mlxtran and PharmML models.). Details are available on their website: Here is a PKPD example for warfarin. Simulx also supports interactive visualization through Shiny

Plotly is an innovative Canadian startup founded by Alex Johnson, Chris Parmer, Jack Parmer, and Matt Sundquist headquartered in Montreal, Quebec. Plotly is an online analytics and data visualization tool that has a variety of tools such as API libraries for various programming languages, and a javascript library. Plotly may be the ideal tool for fast visualization of PKPD data.

To sum up:

R libraries and hosted shiny applications may be ideal for physician level PKPD interface. plotly may be ideal for prototyping patient education tools that can be later converted into a web application using the various APIs.

P.S. Shiny example for PKPDsim is not functional at the time of writing. Ron has promised to fix it soon.

Phonegap and AppPharmacy – Just what the doctor ordered!

Phonegap for mHealth

Image credit: Unsplash@pixabay

Health Care is getting swathed in mobility and mHealth. Though the term is not yet adequately defined, mHealth is the new buzzword. mHealth, unlike many other eHealth specialities, has provider/doctor and consumer/patient aspects. This dual nature helps mHealth to be instrumental in improving the quality of care delivery and patient empowerment. mHealth will also play a major role in population health.

With more than 100,000 mobile Apps available for download from Google play and Apple App store, it is difficult for consumers to choose what may be of benefit to them. It is hardly surprising that only a handful of these 100,000 apps is being used in a meaningful way. Very soon, apps may make their foray into a doctor’s prescription. There may even be App-Pharmacists who would create/reconstitute and dispense an app that the doctor ordered. Custom made apps may also be needed for clinical trials in population health such as HOPE-4 of PHRI.

The App-Pharmacists must be able to prototype an app within a short time with a highly ‘agile’ software development cycle. This article is an introduction to ‘phonegap’, which I believe would be the ideal tool for the App-Pharmacists of tomorrow. A basic idea of phonegap would help eHealth professionals to evaluate the opportunities and limitations of this platform!

Healthcare apps could be Web apps, Hybrid Apps or Native Apps. Web apps are just responsive websites that fit the mobile device well, using any of the frameworks such as jQuery mobile. Obviously it is the easiest to build and maintain, but it cannot access mobile specific features such as camera and GPS. If the app is used only to display information (as in ClinicalConnect™) this is the best solution.

Hybrid apps are packaged in a full-screen browser to resemble a native mobile app, with extensions that provide access to some hardware features, but your user interface is still written in HTML/CSS and rendered by a web browser. Phonegap is a popular framework to create hybrid apps. Phonegap was initially called Cordova after a street in Vancouver where the parent company Nitobi was based.  Adobe bought phonegap and licensed it under Apache. Though you don’t generally associate open-source with Adobe, phonegap for all practical purposes remains free and (hopefully) will remain so in the future.

So why should you use phonegap?

  1. It is free.
  2. Nothing new to learn, You program in HTML, CSS and javascript.
  3. Compile in the cloud (Free if your project is on github and open-source!)
  4. Fast prototyping with basic debugging in the browser.
  5. Fast build cycle, with a single interface for all major platforms.

Where can you get Phonegap?
Get it here: http://phonegap.com/

OR install using npm

sudo apt-get install nodejs nodejs-dev npm
sudo npm install -g phonegap
phonegap create my-app
cd my-app
phonegap run android

You may have to revert the ownership of .npm folder back to the user after global install.


chown -R <username> ~/.npm/

Want to see a simple, but working project to learn fast?
Try my Charm!: https://github.com/dermatologist/phonegap-charm
Want to know about Charm?: http://gulfdoctor.net/charm/

Do you want a step by step tutorial on how to start using phonegap. Please comment below!

Not happy with phonegap? Will discuss Titanium soon!

GIT for doctors (Part 3) – stash, branch, merge, rebase and tag

To continue with our git story: Read the full series on GIT for doctors here

If you think you have made a mistake, you can “stash” the changes. Your file will be returned to the previous state. You have the option of returning to the stash if needed, but this is beyond our scope at present.

Now let us consider another scenario: You have two differential diagnosis for your patient and you want to investigate the patient for both conditions. You may decide to keep two versions of the same case sheet to continue the work up on both differentials. In Git you can create a “branch” for this situation. You can work on branches independently. The main branch or the trunk is called “master” by convention. You can give any name for the other branches.

Embiodea
Embiodea (Photo credit: beapen)

If you decide to consult your colleague, he/she may want to continue working on their copy without changing the “master” file in your possession. So they can work on their “branches” too. Later on if you want to add your differential branch or your colleague’s branch into the master file, you can choose “merge”.

You can create branches of branches. If you want to merge several such branches into the “master”, you have to paste all branches together into a single branch. This is called “rebase”.

If you have to submit a master chart for audit, you can “tag” the chart, so that you can give a name to the current state. “Tagging” for software is generally done when you decide to release a version to the end user.

In the next part, I will discuss how to collaborate with your friends. If you are not on github.com as yet, do register for an account now. If you want to follow someone, let me suggest yours truly: https://github.com/dermatologist

Read the full series on GIT for doctors here